Friday, July 26, 2013

Tranny News!

Well - no real good news - I need more parts...

I replaced the clutch because it was not in great shape 50% gone - hot spots on the flywheel and on the pressure plate. The slave cylinder wasn't in great shape either - OEM has a plastic sleeve? - I was shocked.  New one is steel.  included pilot and throw out bearings - Cha-ching - $525 please!

Transmission update - they cracked it open today - stuff it needs:

  • 3/4 shift fork (upgrading to steel) 
  • 3/4 synchro pack
  • 5/6 shift fork
  • 5/6 synchro pack
  • 5th gear
  • Bearings
  • Seals
  • Putting in billet keys while its open
The good news - it will be ready next week - The bad news - my wallet won't be...  $1200

For those working on their firewall.  The transmission was a bitch to get out with the bell housing, and ultimately I had to unbolt the clutch from the flywheel and drop it straight down.

The problem is that top bolt on the bell housing.  I don't know why the instructions are to cut the wide, but short relief in the firewall...  It should be longer, toward the back of the car, and doesn't need to be 4-inches wide.  Longer would enable that bolt to come out on-top of the bell housing and the transmission (with the bell housing) could come out as a unit.

I fixed it for any future tranny work on my car. 

Saturday, July 20, 2013

Two Steps Forward - One Step Back

Well - got the car on the road to the muffler shop today only to find out I have no 4th or 5th gear.  The transmission feels like it is going into gear, but the gear isn't there.  I took the console and boot off the tunnel thinking there may be a clearance issue - but NO.  I will have to drop the transmission to find out what's going on - and I will not be doing that this weekend - I am really mad and totally bummed about it.  I should have opened it up while out of the car, but didn't.  Hindsight is 20/20.

Took a while putting on, jacking up, taking off, adjusting the coil overs, repeat to get the ride height about right - and it looks good.  Before you comment - I already know the directional tires are on backwards only after driving it to the shop - the kid there pointed it out. At least that is a real easy fix.  The transmission - I dunno - crossing fingers and hoping its not fatal.


Wednesday, July 17, 2013

Almost there

Lots of additional progress towards the end-goal...  I expect to take the car down the street later this week (to the muffler shop) for a new exhaust system and alignment.  I will be using Magnaflow components on the exhaust.

I have completed most of the other tasks:

  • Installed all new carpet (what a PITA!).  I got the heavy "mass backing" with Loop Carpet and it is nice, but makes it difficult to work with.
  • Seats are back in
  • Upgraded the stereo - removed electric antenna - installed stubby
  • Installed a NB gauge cluster - rewired dash
  • Installed Dakota Digital Speed calibrator
  • Installed the Audi CV boots on axles
  • Installed FM Little Big Brake Kit
  • Put the fenders / nose back on
  • Rolled said fenders (front and back)
  • Received wheels/tires (Toyo R1R 225/45/15 on J-Speed wheels) 
  • Ordered long lugnuts from 949 Racing
  • Cut the rear bumper cover for dual exhaust - just made it look like the other side.


Left to do:

  • Bleed brake/clutch systems
  • Get Exhaust installed
  • Alignment
  • A/C fill
  • Revisit all nuts/bolts to ensure torque
  • Fix windows (switch is flaky)
  • Install NACA duct on Driver's headlight cover

Pictures:


This is the style switch I'll be building for the windows.  Much more retro and cool than the plastic POS that is came with.

Duct I plan to use on the headlight cover

Tuesday, July 9, 2013

Friday, July 5, 2013

Almost ready!

So lots of progress on the Miata on July 4.  It was a very rainy day here in the South and I got several things done in the shop.

Installed the completed rear subframe with all new parts, drive shaft, axles, hubs and control arms (new bushings).  I have now filled all fluids in the car (except brake/clutch) and installed the headlights.  Once the new Brake kit arrives, I can install that.  I ordered the Little Big Brake Kit from FlyinMiata.  I thought that kit offered the best value of what I have found.

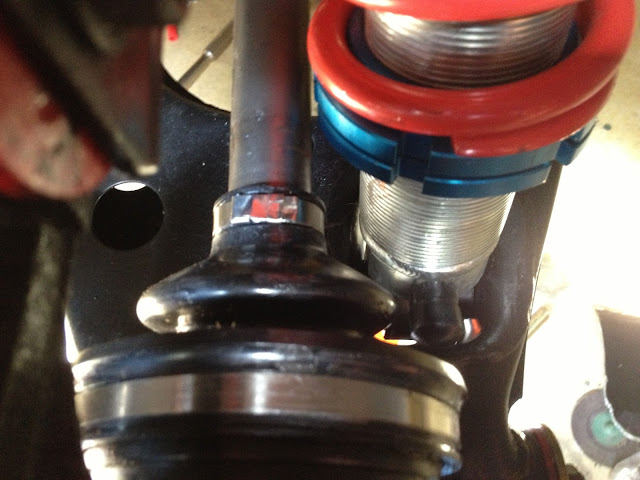
VMaxx setup.  I installed the coil overs in the car, but the rear units are pretty close to the CV boots (see pics below).  Once I am able to set it on the ground, with the wheels/tires I choose, I will be better able to assess that situation.  Note: I am not calling it an "issue" - yet.

Almost ready to test fire.  Unfortunately, I have not received my PCM back from LT1Swap.com - and I am a bit concerned, as I have not been able to get a response from Brendan.  Today marks 2 business weeks since being delivered to LT1Swap.com via UPS, yet I still don't have it and cannot get a response from them.


Front to back under the car

Rear suspension

Yikes!  that is close!  I am not sure how much more pre-load I need on these springs, but this is the minimum due to clearance of the CV boot.  Currently, the CV boot is pushed back toward the hub.  Either way, it is tight.
Front Coilovers - still need to set the ride height, but that may be driven from the rear setting and the CV boot  situation.

 Items left to complete:
  • Address the intake design
  • Install brake kit & bleed system
  • Decide on Wheels/tires
  • Build exhaust
  • Re install interior (new carpet - Black)
  • Re install doors, fenders, hood
  • Alignment


Tuesday, July 2, 2013

Rearend work

As I began to work on the rear end, I found an issue with the V8R bracket and the diff plate integration.  I first ground the plate, but in the end, it needs to be so deep that it creates a hole in the diff plate.  What to do?  Weld it up, of course... 


Had to modify the rearend cover to fit the V8R bracket.  Unit is upside down.
Front bracket for the 8.8 diff welded into place

More welding


Mounted to the subframe (upside down at this point)

view of the back side

I have replaced all the bushings in the control arms too.